- Canada’s Growing Zones Are Changing 2024 - January 12, 2024
- Attracting Wildlife To The Garden - May 16, 2023
- How To Garden Near A Septic Tank - May 9, 2023
As gardeners, our number one goal is to achieve the highest rates of germination when starting seeds. The best way to determine if a seed is viable or if a packet of seeds past the expiration date is good is to do a germination test. While packets of seeds have expiry dates on them. These dates can be wrong when stored under ideal conditions. Or when jump-started to life using a seed soaking method.
In this blog post, we will be looking at the science behind soaking our seeds before planting them in soil. We will explore how soaking seeds can increase the germination rates of not only new seed packets but older ones you’ve been storing for years.
Benefits to soaking seeds
When looking at the benefits of soaking seeds the most obvious is the higher rates of germination. Another benefit is actually the seed’s ability to escape potential rotting or effects of damping. This is due to the reduced time spent in potentially anaerobic situations in the soil.
Dampening is a result of increased numbers of bad fungi or bacteria in the soil profile which ultimately can result in rot. These bad bacteria or fungi enjoy damp and cool areas which are typically found in seed starting trays. The prevention from dampening is:
- seed soaking before planting
- Moist soil, not wet soil
- Bottom source of heat with a heat mat
- Or ambient heating with a heat bulb
What Is Damping Off?
Damping is a generic term that refers to any and all issues that result in either reduced germination rates or seedling death in the early stages of growth. Seed soaking reduces this by allowing the seed to take up the water it needs through the micropyle of the seed prior to being placed in soil.
This means when we decide to soak our seeds we don’t have to keep our soil as moist during the germination process. This is because our seedlings have been exposed to water and we are able to stretch the bounds of semi-moist soil. It is a great idea if you generally are an over waterer or you have issues with dampening in the past. This is also a great solution if you have a special seed-starting or very few seeds, to begin with.
Should I Soak My Seeds In Water Before Planting
Yes, it will decrease the potential for dampening off and speed up germination. There are some seeds that benefit from soaking more than others.
Seeds The Benefit From Being Soaking In Water Before Planting
- Peas
- Beans
- Cannabis
- Corn
- Squash
- Melons
- Cucumbers
- Tomatoes (if you have tweezers)
- Peppers (if you have tweezers)
- Eggplant (if you have tweezers)
- Beets
Seeds The Should Not Be Soaking In Water Before Planting
- Carrots
- Radish
- Onions
- Leeks
- Scallions
- Herbs
- Lettuce
- Cabbage
- Brussel Sprouts
- Most Flower Seeds (anything too small to separate)
How Long Do You Soak Your Seeds Before Planting?
You can soak seeds for 3-24 Hours for most seeds. The longer you soak the seeds the more water will be absorbed. Never exceed 48 hours or after the plants have sprouted because this can cause the seed to rot.
Seed Soaking Causes Faster Germination
The other benefit to this is if you are impatient when it comes to waiting for seeds to germinate. If you have a seed that has a longer germination time such as a hot pepper which can take over four weeks. You can actually expedite the process by up to one week or more by soaking your seeds. This is due to the fact that the soil moisture is not as important and the baby plant inside is able to capture moisture just through the soaking process. This will kickstart the germination process through the addition of H20.
What seeds should you soak?
What type of seed is completely dependent on personal preference and what you’re willing to deal with. For example, a seed with a thicker outer coating that is larger in size is easier to handle after it has been soaked in water
However, something that is very tiny for lightweights such as a carrot seed or a petunia seed. This may not be easy to handle and therefore it is less than ideal to soak the seeds. This does not mean that these smaller lighter weight seeds won’t benefit from seed soaking. But what you choose to do it’s completely based on your level of patience and tolerance to start seeds.
What I Prefer To Do
I personally enjoy starting seeds that are larger in size with a thicker seed coating. Things like carrot seeds should be gown in a liquid seeding method instead. I would rather direct seed into the ground and have a slightly lower germination rate. I also reuse potting soil check that out here!
If you have the patience to seed the wet seeds that are smaller with a toothpick and a pair of tweezers then please feel free to do so. Just make sure you don’t overburden yourself.
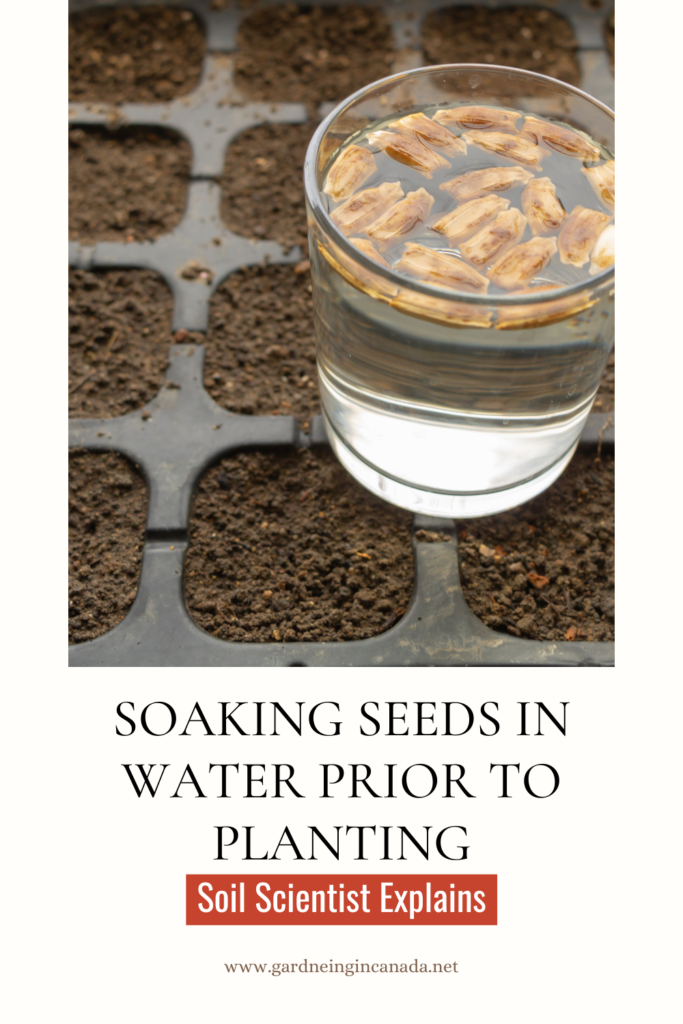
How Do You Soak Seeds In Water Before Planting?
There are two methods to soak your seeds in water before plants. The first one involves a cup of room temperature water. The second method would be to use a moist piece of paper towel inside of a Ziploc.
- Cup Of Water Method: This is best for larger-sized seeds such as corn or peas.
- Paper Towel Method: This is best for smaller seeds such as lavender, passion fruit, tomatoes, peppers, etc.
Soaking Seeds In Hydrogen Peroxide
This is a garden myth, unfortunately. There is zero to suggest hydrogen peroxide is going to increase the germination rates. If you are using hydrogen peroxide from the grocery store on your plants, soil or seeds you actually may be harming them. I have an entire article going into more details on this.
Seed Anatomy
The best way to understand how seed soaking works is actually to look at the seed’s anatomy. There are two types of seeds one being a monocot and the other being a dicot. Dicots are very commonly seen in the garden and are the plants with the two disk-like leaves. A monocot is a plant that is a blade of “grass” upon emergence. Both seeds internally are structured the same for the most part.
When looking at a seed the first thing we see is the coating, which is the outer layer of the seed. This is what protects the inside from being harmed through weathering or other mechanical features.
Cotyledons Role In Germination
Underneath the seed coating is the cotyledon. This is not the structure you see above ground that is bright green. That is a common misconception. This cotyledon is the storage for the food that the seedling will utilize until roots are developed. The density of the material will vary based on the viability of the seedling. Over time in storage, it is not abnormal for the overall mass of the inside to deplete.
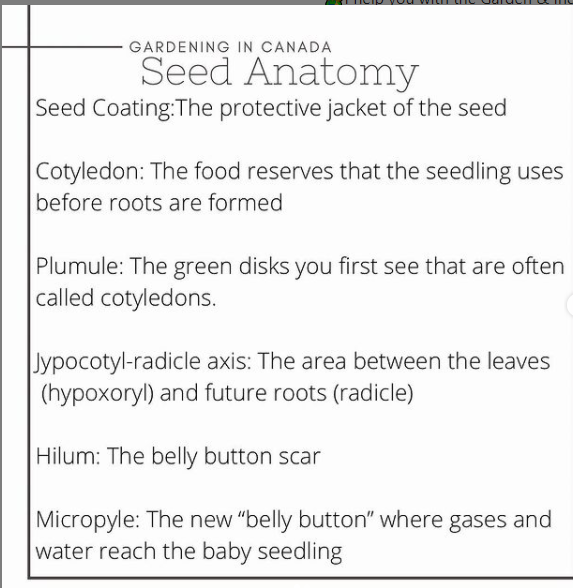
Seeds are alive and just in a dormant state. They are not inanimate objects. That is something to keep in mind when you are seed saving or handling any sort of seed. The second feature is the plumule. The plumule of the seed is actually the cotyledon you see above ground.
These first leaves are not your true first leaves. They are simply there to force the leaves from the ground in a protective manner. Attached to the plumule is the hypocotyl which is the future stem of the plant. Between hypocotyl and the radical is the hypocotyl radicle axis.
The Baby Plant Inside
This is the junction where the future stem and the future root meet. The radical is the future root tip of the plant. All three of these pieces are integral to being healthy. If any of these parts are missing you will not have a successful seedling. When we look at what is attached to the hypocotyl radicle axis we will see a little dot. This pinprick is the micropyle. The micropyle is essentially a belly button to the great outdoors. This tiny little hole, that most of you cannot see with your bare eyes, is the junction in which gas exchange and water intake happen. This little dot is most important when looking at seed soaking. This is the area in which the water is taken up into the seeds.
The Secret Micropyle
This hole is valuable. Imagine the seed in a soil suspension covered with soil particles, water, & air. This brings light to why it would be difficult for the plant to uptake that much-needed water to start the process. That is why the soaking is valuable, it allows for water to penetrate the seed immediately rather than waiting for dampening to take place.
It is important to keep in mind that you should not soak your seeds for an extended period of time. That little pin-size hole is also responsible for gas exchange. Seedlings are alive and therefore they not only need water but we also air. If the hole is suspended in water for too long, gas exchange cannot take place and the seedling will suffocate.
Time Frame
This suffocation is the same kind of suffocation that would happen in an oversaturated anaerobic soil. Typically 24 hours is the maximum amount of time unless otherwise directed by the seed company.
Personally, my timeframe for soaking is 3 to 4 hours before I actually plant in this potting soil. This seems like ample enough time to get enough water into the seedling without affecting any sort of gas exchange. The exception to this rule is passion fruit flowers where I have soaked them for up to 24 to 48 hours before planting them in the ground. This is because that was the direction of the seed company.
Seeds Belly Button
The last part of the seed to mention is the hilum. The hilum is actually not a functioning part of the seed. This scar represents the area in which the seed used to be attached to the flower. The hilum is incredibly noticeable on things such as legumes, corn and larger seedlings. Just because you can’t see it on a smaller seed does not mean it is not present. But again the healing has no function in seed germination.
Water Temperature and Type
The warmer and temperature of the water the better. Obviously use some reasoning here you don’t like boiling hot water. A good rule of thumb is if your finger feels uncomfortable in the water, the temperature is probably too hot. Lukewarm water is ideal.
The reason for this is it will allow the water to penetrate the seed with much more ease. Heat also notoriously helps seedlings germinate a little quicker even in a semi-heated soil setting.
The type of water is a little concerned. I often see comments on My channel saying that tap water is bad. So long as your tap water is drinkable it is useful for watering plants. If you are looking to give a seedling a bit of a buffer from things such as chlorine or chlorine. I suggest looking into using fish Tank water, melted snow, or rainwater.
How Long Should You Soak Seeds
I mentioned this a bit earlier but the maximum amount of time you would want to leave your Seeds in water would be 24 hours. The reason for this is that we don’t want to suffocate the ceiling. We spoke about this while we were looking at the anatomy of a seed. And the micro file pin size hole is responsible for gas exchange as well as water or take. This means we need to provide a balance of both.
The exception to this rule when soaking seeds would be if the seed provider is asking you to soak them for longer. This is commonly seen in more exotic seeds such as a passion fruit flower. Personally for an average everyday seed will only soak for approximately 3 to 4 hours before starting getting soil.
What Happens When Water Enters The Seed
What is the biology and the chemistry behind what happens when we soak seeds in water? The cotyledons of a plant store the food. This food is in a starchy form which we mentioned before. When exposed to water this starch begins to hydrolyze.
Once the start is hydrolyzed by the water it releases an enzyme diastase to form glucose. There’s glucose than undergoes aerobic respiration that produces heat energy, carbon iv oxide and water. This water activates enzymes and which then break down stored food into a soluble form.
This soluble food form and water hydrolases are then transported through various cells within the cotyledon area to the region around the radical and plumule. This then will start the process of swelling these parts of the seed. And the swelling will ultimately break the seal middle allowing for these portions of the seed to emerge.
This is what we call a seedling. The glucose mixture will be bioavailable to this baby seedling until the root is formed and functioning. Once a root is established and the first true leaf emerges for photosynthesis; natural processes within the root such as mass diffusion, osmosis and active transport mechanisms will take over.
Why Do Some Seed Float?
An old wives tale is that seeds that float are no longer viable. And while there is some truth to this it is not always the case. The situations where floating seeds are considered viable are in the case where the cotyledon of the plant has degraded leading to air pockets under the seal coating which then helps the seed to float.
This floating seed due to air pockets is commonly seen in older seeds that are no longer viable. Or in seeds that did not fully form before harvest. These even if you didn’t plant them would not survive.
However, there are two other factors that cause a seed to float. The first one is the unique seed coatings found on some seeds. Such as a thin layer of material that captures air bubbles such as what we see in milkweed seeds.
The second situation would be if the seed has air bubbles trapped beneath it attached to the seed coating. This will cause the seed to float but if you gently tap on the top of the seed to knock off some of the bubbles the seed should then sink.
Conclusion On Soaking Seeds Before Planting
Overall seed soaking is a great idea if you are looking to get the highest rates of possible termination. Its soaking is also advantageous if you are looking to get seeds germinated approximately one week faster than what would normally take place in the soil. This is due to the unique features found on the seed across the planet. The main feature of that tiny little pinhole is called a micropyle. This little pinhole is what allows water and gas exchange which ultimately is what causes the seed to germinate
When we have a seed fully immersed in the water we allow that microphone to take as much water as is necessary to start the termination process. Whereas in a soil situation we are relying on the equal parts of gas exchange, water uptake and the soul profile to allow for germination.
It is important to remember we do not want to soak our seeds for any longer than 24 hours. Unless otherwise indicated on the seed packet. This is important to ensure that we do not drown our seeds out. I personally enjoy soaking my seats 3 to 4 hours before I plant them in the soil.
If your seed is floating do not immediately assume that it is inviable. This is an old wives’ tale and is rarely the case. Look for things such as the bubbles on the other side of the seed or unique see that features on the outer coating.
If you read this blog post please let me know in the comments if you soak your seeds and why. Let me know if you noticed a faster germination rate when you soak your seeds and I look forward to hearing from you guys next time